
|
|
#1 |
|
Участник
|
Gareth Tucker: Scribe Insight and Microsoft CRM 2011
Источник: http://gtcrm.wordpress.com/2012/05/0...soft-crm-2011/
============== In my last post I shared my first impressions of Scribe Software’s Scribe Online product. In this post I will have a similar look at their other product: Scribe Insight. Scribe and their Scribe Insight product have been around for 17 odd years, providing a data migration and integration toolkit for a range of CRM applications. The product has a long history with Microsoft CRM too and is used by a vast number of partners and customers globally. They offer an interesting product that offers an alternative to custom .Net scripting, fitting somewhere in between CRM’s Data Import Wizard and the likes of SSIS, BizTalk and TIBCO. They have licensing options aimed at data migration scenarios where you buy a 60-day license at a discounted price. And they have your normal one-off purchase + annual maintenance license options as well. You can try the product for free on a 30 day trial, with a 100 record limit so its not difficult to get your hands dirty if you want to. Here’s my experience doing just that… The installation experience was much like any other product. You have the Scribe Insight product to install and then each Adaptor that you wish to use. I went ahead and installed the Microsoft CRM 2011 Adaptor. They have adaptors for a range of CRM and ERP products and integration approaches for other products where an adaptor is not required (such as SAP):  (For those wondering how Scribe enables integration with SAP check out this video) Its these Adaptors that make Scribe attractive. They take away the need to learn the specifics of a system’s database schema or APIs, you just have to map your data to the fields the Adaptor surfaces and it takes care of uploading your data and takes responsibility for maintaining the integrity of the database. Scribe Data Migration from a Staging DB into Microsoft CRM Ok, let’s work through a data migration scenario. I have a source system that contains Contact and Account records and I want to load those into my lovely new Microsoft CRM system. Each of my Contacts is parented by an Account and each Account also has a Primary Contact. So, I’m going to have give my data migration sequencing a little thought. I get the data out of my source system and load it into a pair of staging tables in SQL Server. Staging Database:  Contacts:  Organisations (Accounts):  Now, if my source system was Salesforce.com or Goldmine or something like that I could have used one of Scribe’s adaptors and skipped the need to extract to a staging db. But for this exercise I will just use SQL as my source. I launch Scribe Workbench – this is Scribe Insight’s console for configuring migration and integration jobs. First thing I need to do is connect to my source data, so I click the Configure Source button: 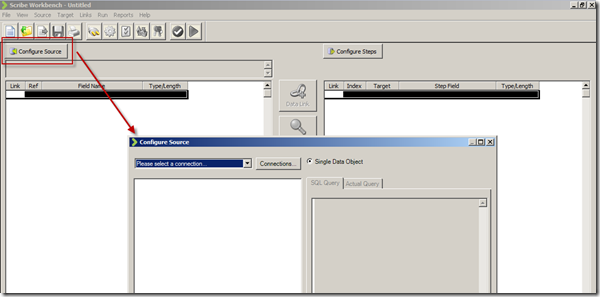 Here I can choose the CRM adaptor I installed or a ODBC, text file or XML connection. I choose ODBC and configure a connection string to my SQL database:  Next, I drill into that connection and chose the specific table I want as my source. I am going to import my Account records first so I pick the corresponding staging table:  With the migration source defined I now move onto the destination system and the actions I want executed. I click on Configure Steps and from a similar connection dialog I chose my destination system, in this case Microsoft Dynamics CRM 2011:  I am prompted for my CRM connection details: Note: CRM On-Premise, Online and IFD are all supported 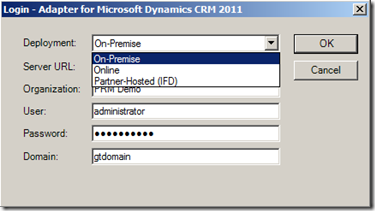 Now at this point some advanced settings become accessible. I’ll give you a quick look at them as in some scenarios they will be quite important:   Next, I select my destination entity:  And the action I require:  Next I need to map the individual fields. I highlight my first source field, and then the matching destination field and then I click the Data Link button: 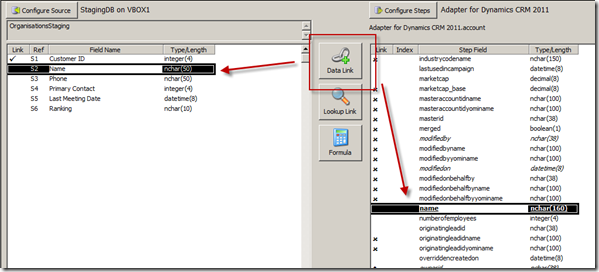 I repeat for each field, except for the Primary Contact field. I will need to come back and update the field later once I have migrated the Contacts. Now, one of my fields requires a bit of transformation on the way through. My Customer Ranking field is a pick list in CRM with options ‘Gold’, ‘Silver’ and ‘Bronze’ and with underlying database values of 1, 2 and 3. But back in my source system these rankings are stored as G, S and B. My preference in a scenario like this would be to perform this transformation in the staging database with SQL scripts rather than mucking around with transformation in a migration tool. But you can’t always do this (e.g. when migrating directly from a source system) so let’s see how Scribe addresses on-the-fly transformations. Scribe’s answer is Cross Reference Keys. From the toolbar I click the Cross Reference Keys button and then inform Scribe where it has to look to find the mapping between my source and destination values. When you install Scribe it creates a SQL database for itself called SCRIBEINTERNAL and within that db there is a table you can use to house cross reference maps. I select that table (“KEYCROSSREFERENCE”) and tell Scribe to look for rows labelled “Ranking”: 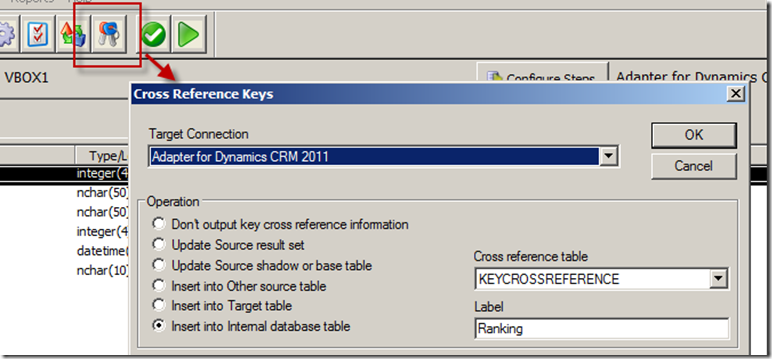 Once I understood this was Scribe’s approach I jumped over to SQL Mgmt Studio and populated that mapping table with the necessary mapping for my Ranking field:  There’s a bit more to the configuration but that gives you a feel for the process. Let’s do a bit more transformation. Let’s say we want to convert the Company Name to upper case on the way through. For this we will use a Formula. I select the Name field and then click the Formula button:  Note in the above screenshot the source “Name” field over on the left side of the screen has been assigned the reference “S2”. This comes into play in the formula designer. By default every mapping has a formula, as you will see in the screenshot below. The formula simply says “this destination field should be populated by the source field known as S2”):  We can easily change this formula and Scribe offers a bunch of functions for the common transformations required. I expand the “Text” function category, select the UPPER function and see the formula automatically updated for me:  In a similar manner we can apply a formula to the Phone number field to take only the first 6 characters: 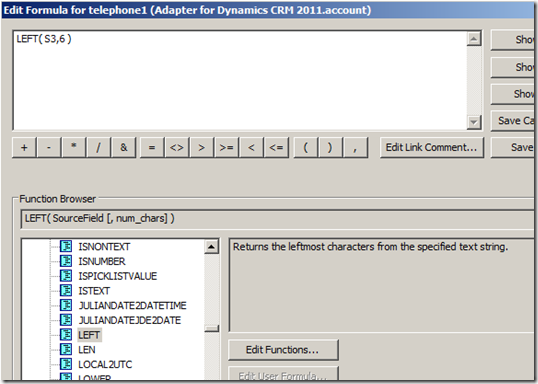 Ok, that’s enough fluffing around, let’s see if this will work. Scribe has a nice little Test feature you can use to preview the migration with. I run that, and can see how Scribe will map a specific source record. I can click Next and Previous buttons to scroll through my source records and make sure a variety of records all appear to be mapping as expected:  So far so good. Let’s run the migration. I click the Run button and very quickly Scribe reports the result of the migration:  And we have success! Here’s the result in CRM:   Now that I have my Accounts successfully migrated into my CRM system I can now load my Contacts. I save the Account migration definition (Scribe calls it a “DTS”) and then click the New button to start a new definition (you have to create a new DTS for each source entity/table). I go ahead and repeat most of the same steps I just went through for Accounts. I then get to the point where I need to figure out how to handle the Customer ID (Parent Account) field. Now my source system had its own unique IDs for Accounts and its this value that’s stored on each Contact in my source data to provide the link between each Contact and its parent Account. CRM has its own unique key of course (the GUID) but to support this migration I made sure I loaded the source system’s unique key into CRM when I uploaded my Accounts. I pushed that “Customer ID” field into the Account entity’s “Account Number” field (a spare field I had available in CRM). To be honest, I find this next bit fairly confusing. I did get it to work though so I think it might just be bad terminology. Let me try and explain. The field we are trying to populate is the “Parent Customer” field in CRM. We are going to derive the GUID required for this field via the “Customer ID” field in our staging db. So step 1 is to create a Data Link between those 2 fields:  But a direct data link by itself won’t work as the source system has values like “1” and “2” in the “Customer ID” field and we need to put a GUID into the destination system’s “parentcustomerid” field. If we look at the formula behind the mapping you will see the current formula is insufficient:  What we need to do is change this formula and have the destination field get its value from a “Cross Reference Key” rather than directly from the source field. That means we need to create a Cross Reference Key that will translate the source system’s “Customer ID” into a CRM Account GUID. Now rather than referring to a cross reference table in Scribe’s Internal database like we did for the pick list mapping – we instead point Scribe at CRM for the necessary mapping. The mapping is there for us in the Account table: the Account records I imported each have a GUID and they also have the “Customer ID” unique key from the source system sitting in the Account Number field. So what I need to define is something like this: Mapping table: the CRM “account” table Source system to Mapping table link: “Customer ID” –> “account.accountnumber” Mapping table to Destination system link: “account.accountid” –> “contact.parentcustomerid” Alias for this mapping: ParentAccountID And this is how you fill in the Cross Reference Keys form to achieve the above:  Last step is to go and correct the data map formula. In the formula editor I click on the “Show User Variables” button and then select the Cross Reference Key alias I just defined:  End result is the formula below:  Having sorted that I run the migration and yay – another success!:   We’re 2 thirds of the way there. We’ve loaded the Accounts and Contact and linked each Contact to its parent Account. Now, we need to go back and populate the Primary Contact field on the Account records that we omitted earlier. We had to omit it because the Contacts didn’t exist in CRM at the point in time we were creating the Accounts. It was a crazy chicken and egg Dr Who Timecop John Connor paradox thing. So, we need to re-run the Account records from our source system back through Scribe and run an update. To do this, I need to figure out how to get Scribe to do an update rather than an insert. First step towards achieving that is to chose “Update” as the action required. I do this back when I first select CRM as the destination system:  Then I need to tell Scribe how to match each source record to its corresponding destination record. I select the “Customer ID” field in the source system and the “accountnumber” field in the destination system and click the Lookup Link button:  This tells Scribe that wherever these 2 fields match it should do an update. Next, we create a data link between the “Primary Contact” field in the source system and the “primarycontactid” field in the destination system. This link will of course require transformation so another Cross Reference Key will be required. So what I need to define is something like this: Mapping table: the CRM “contact” table Source system to Mapping table link: “Primary Contact” –> “contact.new_externalcontactref” Mapping table to Destination system link: “contact.contactid” –> “account.primarycontactid” Alias for this mapping: ContactID Here’s how that looks:  Last step, just like before, is to edit the formula on the data map to refer to this mapping:  And if we run that, yeap, it’s success again:   Now that we have our jobs working individually lets string them together to give us just the one data migration task to execute. One approach to this is to make use of Scribe’s command line capabilities. Here’s a simple batch file that launches each of my 3 DTS jobs in sequence. The “/RS” switch tells Scribe to run each job in Silent mode, preventing any screen messages from blocking processing: c:cd\cd Program Files (x86)\ScribeTworkbench "C:\Customer Migration - 1-Accounts (Insert).dts" /RSTworkbench "C:\Customer Migration - 2-Contacts (Insert).dts" /RSTworkbench "C:\Customer Migration - 3-Accounts (Update).dts" /RS Another approach is to chain the jobs together. I open Job#1 and click on the Settings button on the toolbar. Here I can tell Scribe to run Job#2 upon completion of Job#1. I then open Job#2 and chain that one to Job#3. You get the idea. There are some additional parameters you can set as well:  When you kick off a chained job you get presented with the option to have a proceed/cancel prompt appear between each job or to just have them run in sequence without intervention:  There you have it, a fairly comprehensive introduction to Scribe Insight as a Data Migration tool for Microsoft CRM. This blog post has gotten away from me a bit but before I finish up I just want to touch on the small variation required to create an on-going Integration rather than a one off migration… Scribe Insight for Integration Scenarios Lets create a 4th DTS job to handle the on-going synchronisation of Contact data between the staging db and CRM. I setup the source and destination connections and then chose Update/Insert as the Operation (I want the interface to handle both new records and updates to existing records):  I then click on the Operation tab and tell Scribe to perform an Update rather an Insert when it is able to match source field 11 (ContactID) to the destination field “new_externalcontactref”):  Then, it’s simply a case of mapping each of the source and destination fields just like I did before for the data migration of Contacts. And I’m done: 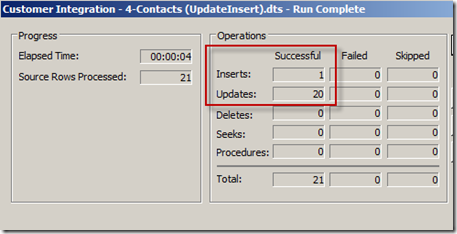 If you have any experiences to share or have found this useful please leave a comment below.  Источник: http://gtcrm.wordpress.com/2012/05/0...soft-crm-2011/
__________________
Расскажите о новых и интересных блогах по Microsoft Dynamics, напишите личное сообщение администратору. |
|
|
|
|
| Опции темы | Поиск в этой теме |
| Опции просмотра | |
|